Cisco ACI – Management In-band
This post covers a non-best practice design for the Management Network in Cisco ACI (Application Centric Infrastructure). The implementation of Management In-band instead of the recommended Management Out-Of-Band (OOB). An OOB network increases the odds that you will be able to access the devices in the event that the fabric is experiencing production issues and is unavailable.
However, some companies have limitations to deploy an OOB design and an In-band deployment is the only real alternative. The configuration for the In-band Management in ACI is what is described on this post because documentation is not very clear for this implementation case.
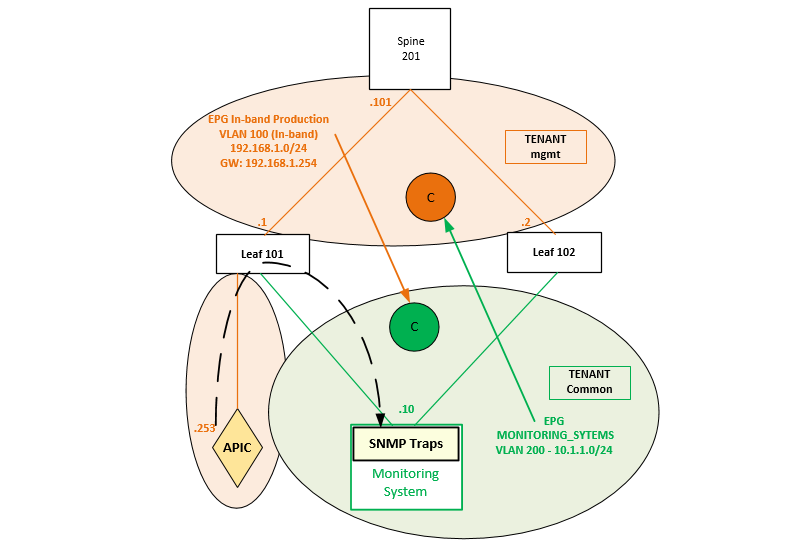
Logical Topology

Application Policy Infrastructure Controller Version 3.0(2K)
What do we want to achieve with this configuration?
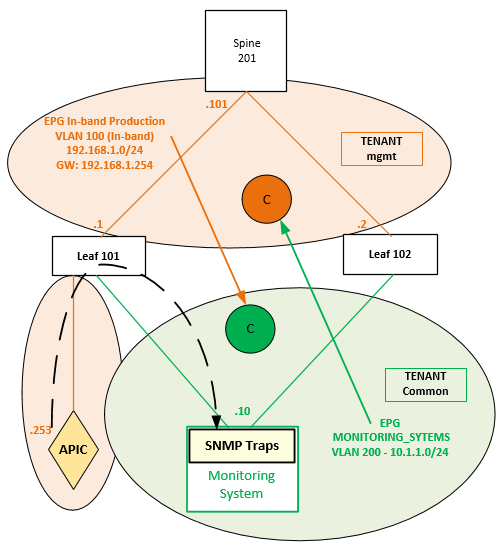
The purpose of this configuration in ACI is to allow communication from the EPG MONITORING_SYTEMS, where the Monitoring System is located, to the Management In-Band Production network, where the ACI infrastructure: APIC, Leafs and Spine have IP addresses. Bidirectional communication is required for the fabric to receive SNMP Queries (Polling) from the Monitoring System and send SNMP Traps from the APIC, Leafs and Spine to the Monitoring System when some pre-configured conditions are met.
The EPG MONITORING_SYTEMS, where the Monitoring system is located, is part of Tenant common and In-band EPG – PRODUCTION is part of Tenant mgmt. Therefore, there is an inter-tenant traffic flow between Tenant common and Tenant mgmt which requires the use of Contracts.
Tenant Mgmt
This is the procedure to follow .
Mgmt InBand
- Choose TENANTS > mgmt. In the Navigation pane, expand Tenant mgmt > Networking > Bridge Domains to configure the bridge domain on the in-band connection.
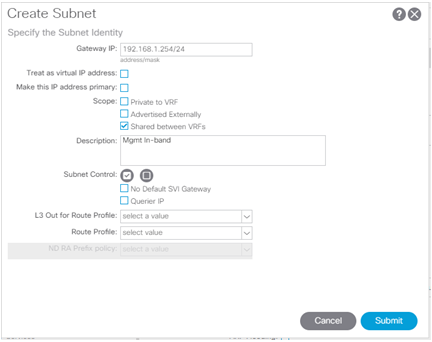
- Right-click the in-band bridge domain, click Create Subnet, and perform the following actions:
- In the Create Subnet dialog box, in the Gateway IP field, enter the in-band management gateway IP address.
- In the Mask field, enter the subnet mask if it does not self-populate.
- Shared between VRFs to allow communication to other services in common.
- Click Submit.
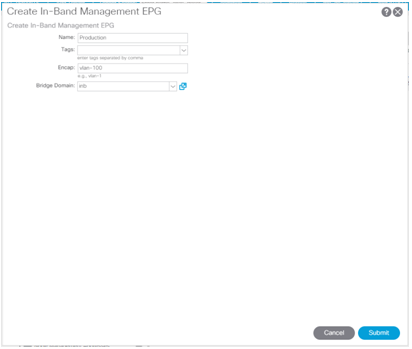
- On the menu bar, choose TENANTS > mgmt. In the Navigation pane, expand Tenant mgmt > Node Management EPGs, right click Create In-Band Management EPG, and perform the following actions to set the VLAN on the in-band connection:
- Choose a name.
- In the Encap field, enter the VLAN.
- Click Submit.
- In the Status dialog box where the Changes Saved Successfully message is displayed, click OK.
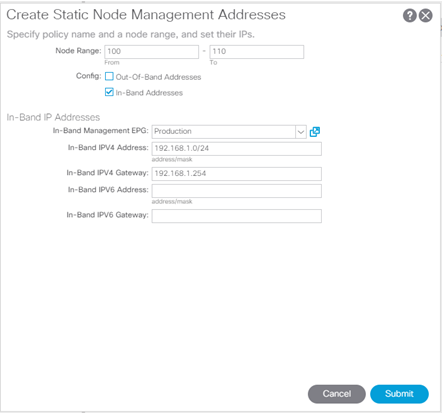
- On the menu bar, choose TENANTS > mgmt. In the Navigation pane, expand Tenant mgmt > Node Management Addresses, right-click Node Management Addresses, and click Create Static Node Management Addresses.
- In the Create Static Node Management Addresses dialog box, perform the following actions:
- In the Node Range fields enter the range of nodes (Node IDs of Leafs and Spines – Node Range).
- In the Config field, click the checkbox for In-Band Addresses.
- The In-Band IP Addresses area is displayed.
- In the In-Band Management EPG field, from drop-down list, choose the EPG.
- In the In-Band IPV4 Address field, enter the In-band subnet and the mask.
- In the In-Band Gateway field, enter the in-band gateway address.
- Click Submit.
- In the Confirm dialog box that displays for confirmation that this will assign new management IP addresses to the selected range of nodes, click Yes to proceed.
The first node that was ID specified in the node range is allocated with the first or starting IP address. The next node ID is allocated with the next IP address and so on sequentially.
Finally, the automatic assignation of IP addresses for Spine and Leafs is displayed below.
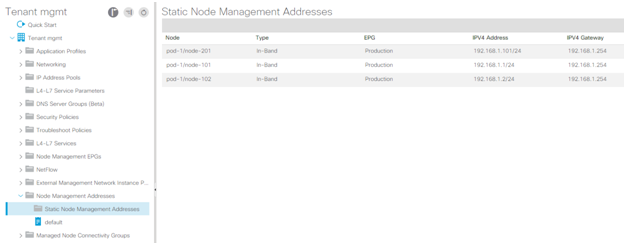
The APIC Mgmt In-band IP address (192.168.1.253) is, in this case, configured manually:
- In the Navigation pane, right-click Node Management Addresses and click Create Node Management Addresses, and perform the following actions to configure the IP addresses to be assigned to APIC controllers in the fabric:
- In the Create Node Management Addresses dialog box, in the Policy Name field, enter the policy name.
- In the Nodes field, select column, check the check boxes for the nodes that will be part of this fabric (apic).
- In the Config field, check the In-Band Addresses check box.
- In the Selected Nodes field, select Specific.
- In the In-Band IP Addresses area, in the In-Band Management EPG field, from the drop-down list, choose Production. This associates the Production in-band Management EPG.
- In the In-Band IP Addresses and Gateway fields, enter the IPv4 address (192.168.1.254).
- Click Submit. The IP address for the APIC is now configured. In this scenario there is only one APIC, therefore there is only one IP Address in the IP In-band Addresses range.
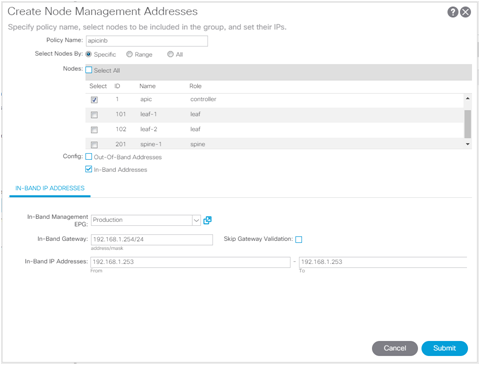
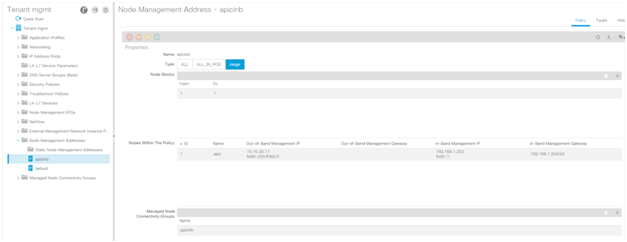
At this point, you should have connectivity in the In-band Management EPG Production:
admin@APIC:~> ping 192.168.1.2
PING 192.168.1.2 (192.168.1.2) 56(84) bytes of data.
64 bytes from 192.168.1.2: icmp_seq=1 ttl=64 time=1.54 ms
64 bytes from 192.168.1.2: icmp_seq=2 ttl=64 time=0.267 ms
64 bytes from 192.168.1.2: icmp_seq=3 ttl=64 time=0.244 ms
64 bytes from 192.168.1.2: icmp_seq=4 ttl=64 time=0.246 ms
^C
— 192.168.1.2 ping statistics —
4 packets transmitted, 4 received, 0% packet loss, time 3001ms
rtt min/avg/max/mdev = 0.244/0.574/1.540/0.557 ms
Securing the Inb Management Plane
Next step is configuring the Contract to be provided by the In-band EPG – PRODUCTION in Tenant mgmt and consumed by EPG MONITORING_SYTEMS in Tenant common.
Filters Configuration
First, Filters (entries of a regular ACL) are configured to specify the traffic allowed to reach (not dropped) the In-band EPG – PRODUCTION from Tenant common in our topology and these are shown in the table below:
| Name | EtherType | IP Protocol | Src Port(s) | Dst Port(s) |
| FILTER_SSH | IP | TCP | ANY | 22 |
| FILTER_HTTPS | IP | TCP | ANY | 443 |
| FILTER_ICMP | IP | ICMP | N/A | N/A |
| FILTER_SNMP | IP | UDP | ANY | 161 |
| IP | UDP | 162 | ANY | |
| FILTER_SYSLOG | IP | UDP | 514 | ANY |
In addition to SNMP traffic, some other traffic flows have also been included such as HTTPS, ICMP or SSH.
This is the procedure for Filters configuration:
- Tenants > mgmt.
- Tenant mgmt > Contracts > Filters
- Right Click > Create Filter.
SNMP Filter:
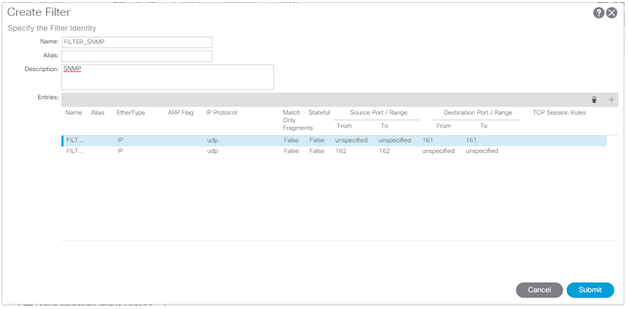
SSH Filter:
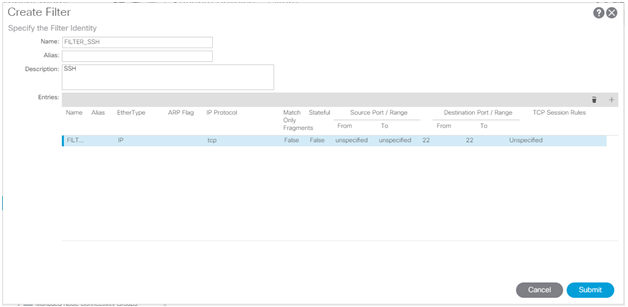
The same process needs to be repeated for all the Filters in the Table.
Contract Configuration
Next step is Contract configuration where Filters are associated to a Subject which is linked to a Contract.
Follow the next steps:
- Tenants > mgmt.
- Tenant mgmt > Contracts
- Right Click > Create Contract.
- Subject click on the + symbol to configure de new Subject.
- Add the filters configured in the step above following the details on the table.
| Name | Filters | Apply Both Directions | Reverse Filter Ports |
| SUBJECT_MGMT_INB | FILTER_SSH, FILTER _HTTPS, FILTER _ICMP, FILTER _SNMP, FLT_SYSLOG. | YES | YES |
Contract Subject:
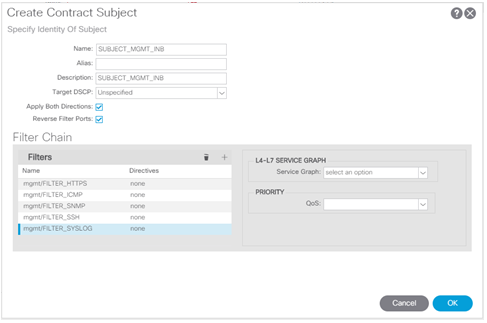
- Once the Subject is configured, specify the name of the Contract and the Scope according to the table below.
| Name | Tenant | Scope | Subject |
| CONTRACT_MGMT_INB | Mgmt | Global | SUBJECT_MGMT_INB |
Note the Scope must be set to Global for CONTRACT_MGMT_INB Contract to be “consumed” by EPG MONITORING_SYTEMS which is part of a different Tenant, Tenant common.
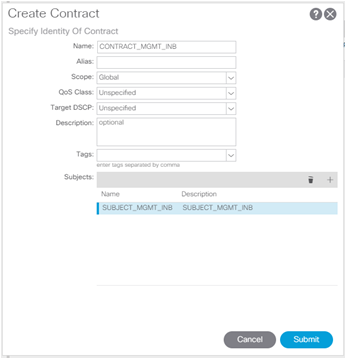
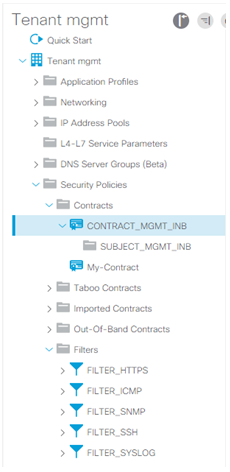
For the CONTRACT_MGMT_INB to be “consumed” by EPG MONITORING_SYTEMS in Tenant common, it must be “Exported” first.
- Tenants > mgmt.
- Tenant mgmt > Contracts > Standard
- Right Click > Export Contract.
Note the “Tenant” field is the Tenant the Contract is being exported to: Tenant common in our topology.
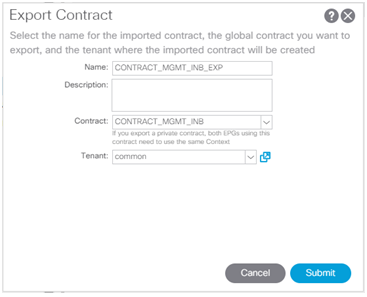

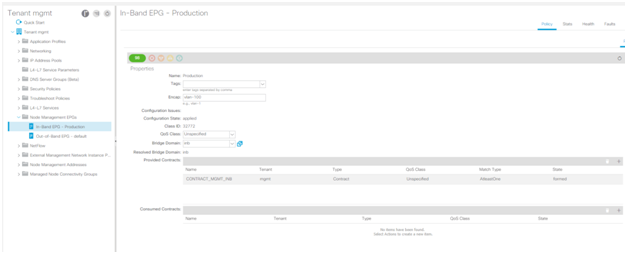
Now that the contract has been “exported” it can be “provided” by In-band EPG – PRODUCTION in Tenant mgmt to be “consumed” by EPG MONITORING_SYSTEMS in Tenant common.
- Tenants > mgmt.
- Tenant mgmt > Node Management EPGs> In-Band EPG – PRODUCTION
- Add Provided Contracts > CONTRACT_MGMT_INB.
Tenant common
For the SNMP Traps to be able to reach the Monitoring System from the Fabric it is necessary that EPG MONITORING_SYTEMS “provides” a Contract in Tenant common to be “consumed” by In-band EPG – PRODUCTION in Tenant mgmt. This Contract and its availability to other EPGs is what it is configured in this section.
Filters Configuration
| Name | EtherType | IP Protocol | Src Port(s) | Dst Port(s) |
| FILTER_ANY | IP | Unspecified | ANY | ANY |
This is the procedure for Filters configuration:
- Tenants > common.
- Tenant common > Contracts > Filters
- Right Click > Create Filter.
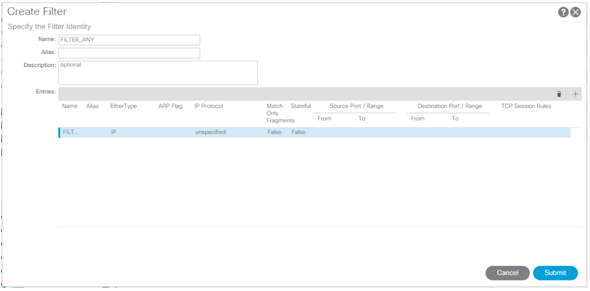
Contract Configuration
Next step is Contract configuration where Filters are associated to a Subject which is linked to a Contract.
Follow the next steps:
- Tenants > common.
- Tenant common > Contracts
- Right Click > Create Contract.
- Subject click on the + symbol to configure de new Subject.
- Add the filters configured in the step above following the details on the table.
| Name | Filters | Apply Both Directions | Reverse Filter Ports |
| SUBJECT_MONITORING | FILTER_ANY | YES | YES |
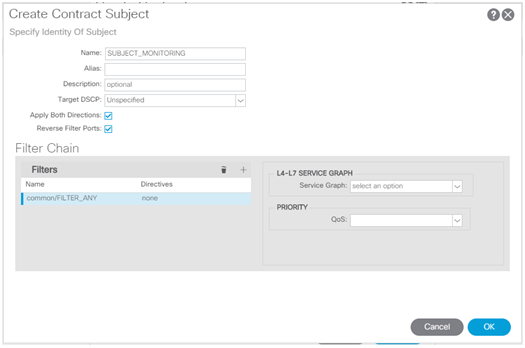
- Once the Subject is configured, specify the name of the Contract and the Scope according to the table below.
| Name | Tenant | Scope | Subject |
| CONTRACT_MONITOR | common | Global | SUBJECT_MONITORING |
Note the Scope must be set to Global for CONTRACT_MONITOR Contract to be “consumed” by In-band EPG – PRODUCTION which is part of a different Tenant: Tenant mgmt.
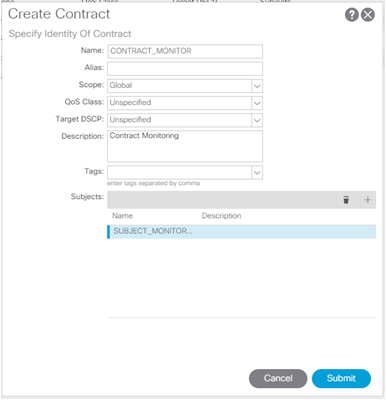
For the CONTRACT_MONITOR to be “consumed” by In-band EPG – PRODUCTION in Tenant mgmt, it must be “Exported” first.
- Tenants > common.
- Tenant common > Contracts
- Right Click > Export Contract.
Note the “Tenant” field is the Tenant the Contract is being exported to: Tenant mgmt in our topology.
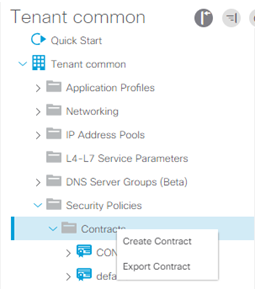
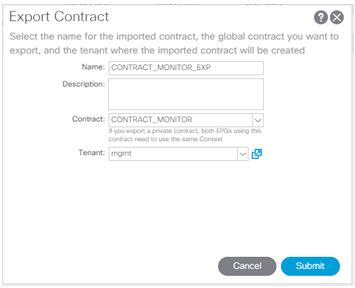

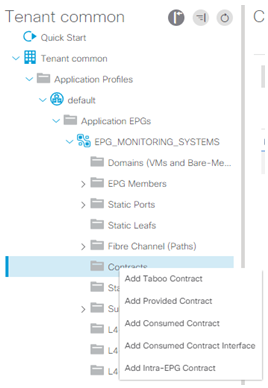
Now that the contract has been “exported” it can be “provided” by EPG MONITORING_SYTEMS in Tenant common to be “consumed” by In-band EPG – PRODUCTION in Tenant mgmt.
- Tenants > common.
- Tenant common > Application Profiles> MONITORING_SYTEMS
- Contracts > Add Provided Contracts > CONTRACT_MONITOR.
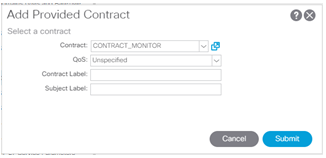

Allowing Traffic Flows
Tenant common
EPG MONITORING_SYTEMS consumes CONTRACT_MANAGEMENT_INB_EXP to allow SNMP Polling/Queries to the Fabric from the Monitoring Sytem. It is worth to notice the Contract is consumed as Contract Interface (“Add Consumed Contract Interface”) for inter-tenant communication.
- Tenants > common.
- Tenant common > Application Profiles> MONITORING_SYTEMS
- Contracts > Add Consumed Contract Interface > CONTRACT_MGMT_INB_EXP.
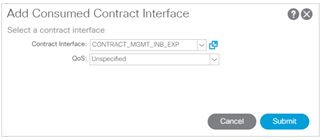

Tenant mgmt
In-band EPG – PRODUCTION consumes CONTRACT_MONITOR_EXP to allow SNMP Traps from the Fabric to be sent to the Monitoring Sytem. It is worth to notice the Contract is consumed as Contract Interface (“Add Consumed Contract Interface”) for inter-tenant communication.


At this point, you should be able to ping from the APIC to EPG MONITORING_SYTEMS through the Mgmt In-band network:
APIC# ping 10.1.1.10
PING 10.1.1.10 (10.1.1.10) 56(84) bytes of data.
64 bytes from 10.1.1.10: icmp_seq=1 ttl=62 time=0.216 ms
64 bytes from 10.1.1.10: icmp_seq=2 ttl=62 time=0.173 ms
64 bytes from 10.1.1.10: icmp_seq=3 ttl=62 time=0.192 ms
64 bytes from 10.1.1.10: icmp_seq=4 ttl=62 time=0.222 ms
64 bytes from 10.1.1.10: icmp_seq=5 ttl=62 time=0.172 ms
If ping is working fine, other traffic flows permitted by the Filters configuration such as SNMP, SSH, HTTPS, etc. should work as well.
Summary:

References